Flutter Isar - The #1 Database for Your Flutter App?!
Inspired by the Flutter DACH Podcast and the guest Simon Choi, I took a closer look at the topic of “Offline First” and local databases. Since I’m currently revising my weather app anyway and wanted to add an offline feature, Flutter Isar came at just the right time.
The idea was that Flutter Isar not only serves as offline storage but also generally as data management for people who don’t want to register or for apps that have no connection to an API at all.
So let’s take a look at Flutter Isar.
Why Is Data Management So Important?
In most apps, data needs to be stored locally, especially for apps that have no connection to an API and certainly not to the internet.
An example of this could be a to-do app that needs to store all to-dos locally. Even if an app offers different settings, these should also be saved.
So far, I’ve used Flutter Secure Storage to store smaller amounts of data, especially the bearer token. However, with the last app update, I took the opportunity to try out Flutter Isar. For the token, I’ll continue to use Flutter Secure Storage.
Flutter Isar Overview
Let’s take a look at the official website of Isar.
- Open source and made especially for Flutter
- Multi-platform (Android, iOS, and web of course)
- Full-text search in the database
- Parallel queries and multi-isolate
- ACID semantics (we’ll also look at this)
- Fast (that’s all we want)
Basically, you can consider Flutter Isar as an evolution of Flutter Hive, but with some improvements and new features. I’ll go into the exact features later. Let’s take a look at how to implement this.
Installation
Flutter packages can be installed in two ways. Either add the package to your pubspec.yaml and run the command flutter pub get.
dependencies:
  flutter_riverpod: ^0.14.0+3
flutter pub getor you install the package directly via the command line.
flutter pub add isarCreating a Data Model
In conventional relational databases like MySQL or MariaDB, tables are created and filled with attributes. So we need a database table in a todo app that stores all todos. This could look something like this:
| id | user_id | todo | done |
|---|---|---|---|
| 1 | 1 | Clean kitchen | true |
| 2 | 1 | Learn Flutter | false |
| 3 | 2 | Write blog article | true |
And we have to imagine the database in Isar similarly, only that the tables here are called collections. Let’s take a look at this in the example app.
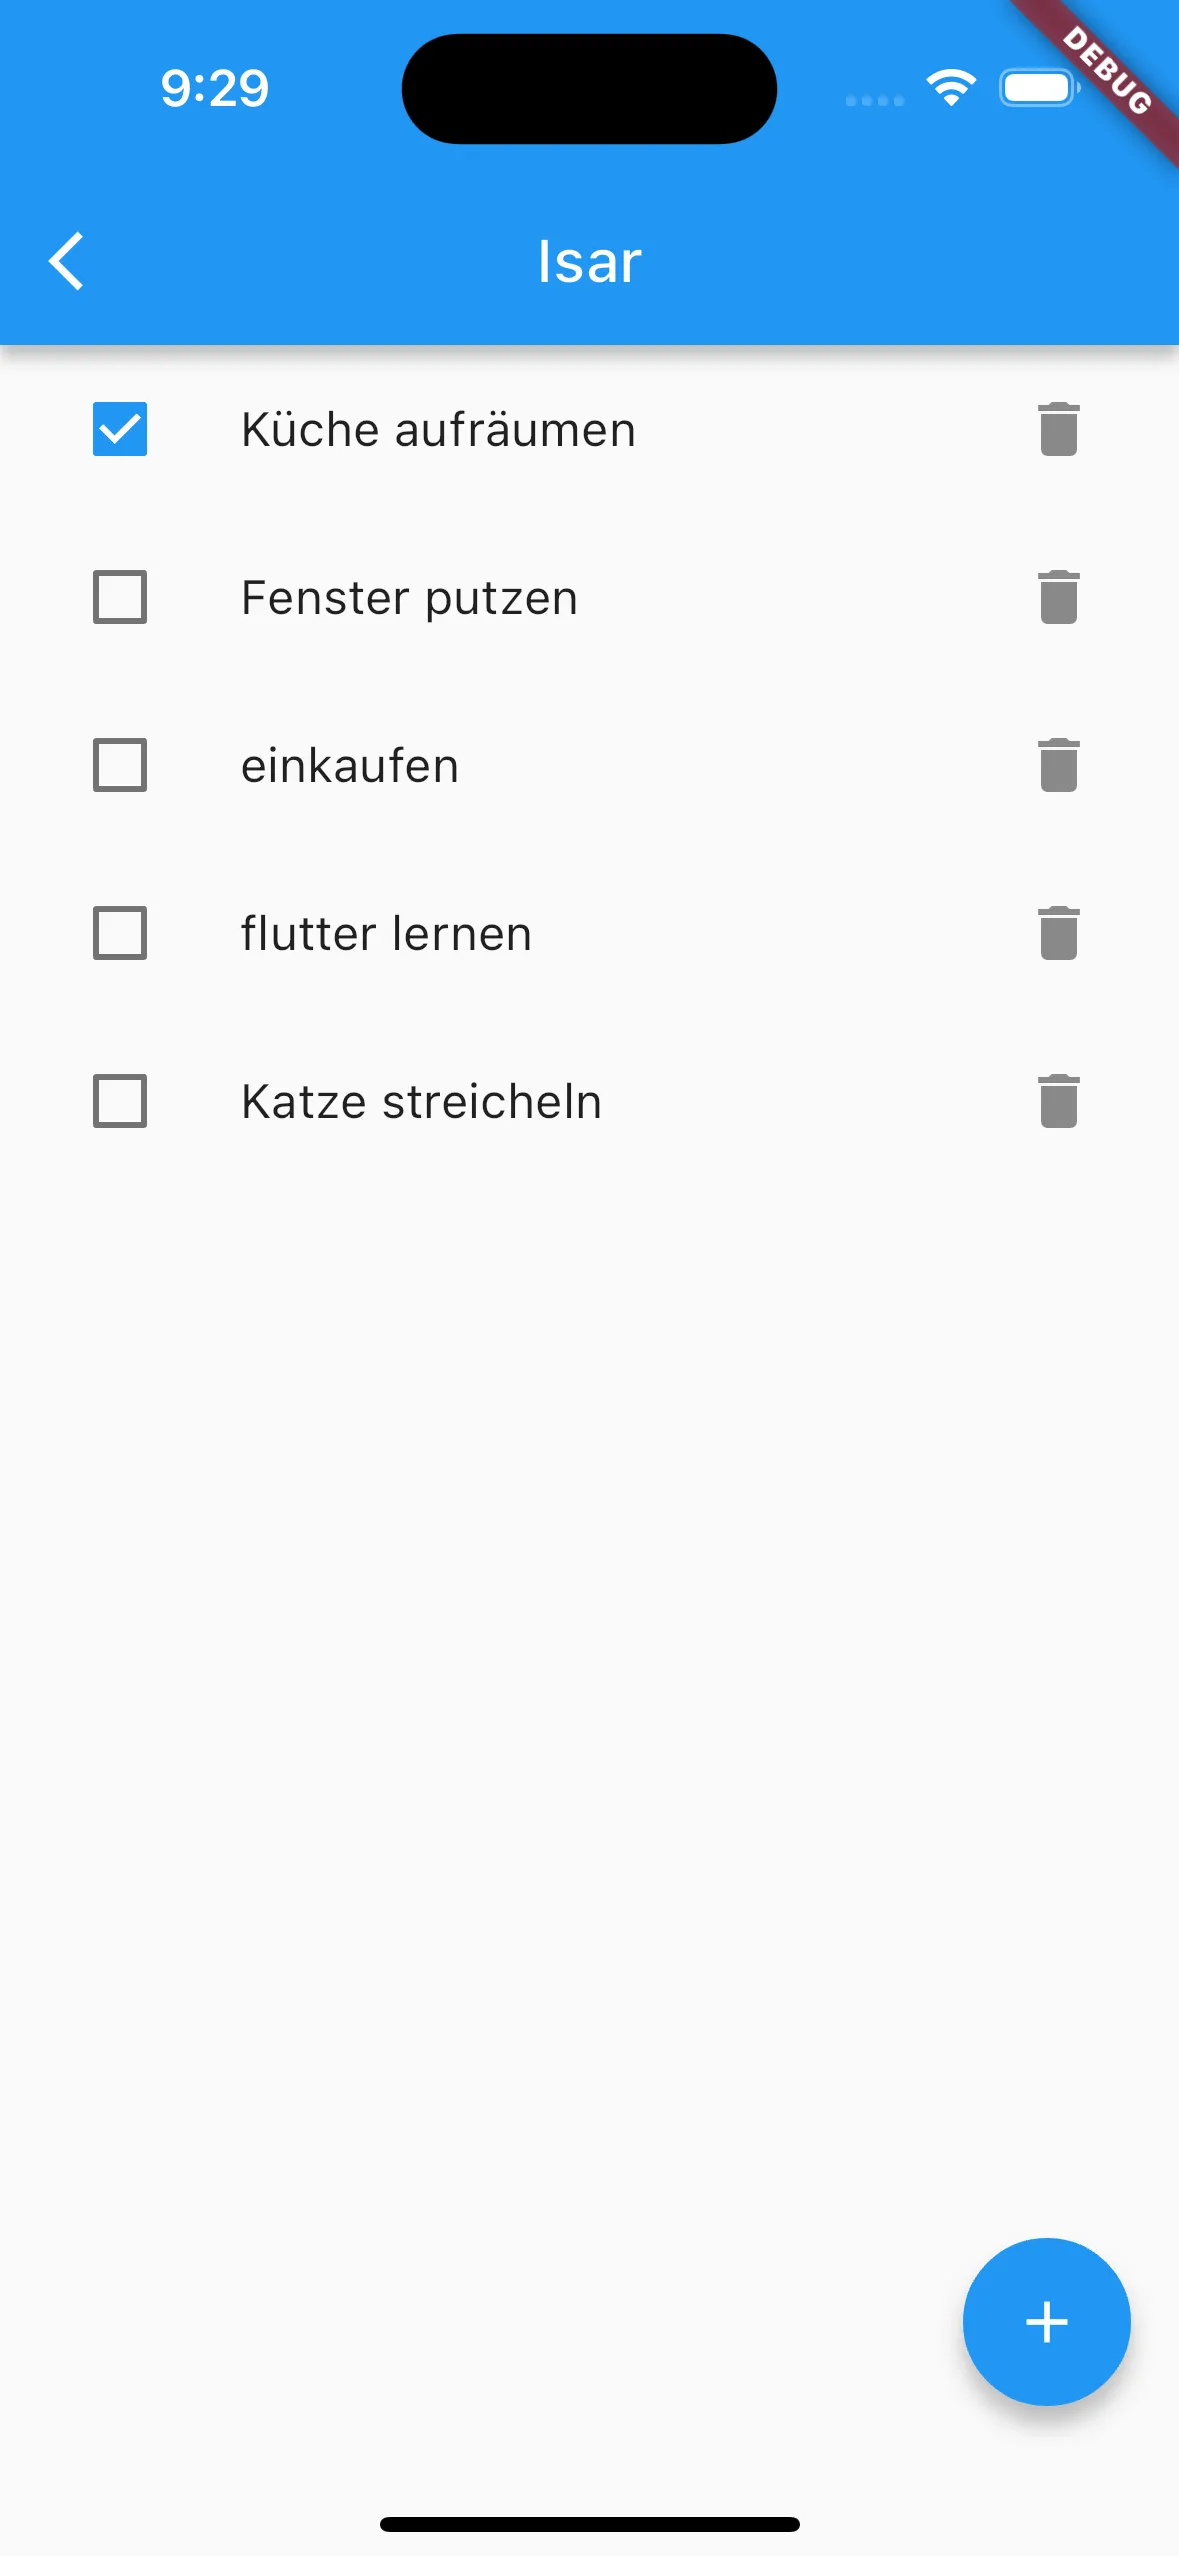
The example app is also a todo app that stores its data in the local database.
Here’s my data model for it:
import 'package:isar/isar.dart';
part 'todo.g.dart';

@collection
class Todo {
  Id? id;
  String? todo;
  bool? done;
  DateTime? createdAt;

  Todo({
    this.id,
    required this.todo,
    this.done = false,
    this.createdAt,
  });

  @override
  String toString() {
    return 'id: $id, todo: $todo';
  }
}
Nothing complex. Todo is our todo as a string, Done indicates whether the todo has been completed, and createdAt is a timestamp that indicates when the todo was created, just for fun.
The annotation @collection defines this model and creates a local collection from it.
Now we just need to run the build command once to generate our helper class.
dart run build_runner buildThis exact command generates the file todo.g.dart. This file contains useful methods that we can use
to create a database query, for example. These work similarly to SQL queries.
Initialize Database
For initialization, I’ve implemented an IsarService. It looks like this:
import 'package:isar/isar.dart';
import 'package:path_provider/path_provider.dart';
import 'package:wetterfest/models/clothes.dart';
import 'package:wetterfest/models/setting.dart';
import 'package:wetterfest/models/user.dart';

class IsarService {
  IsarService() {
    instance = openDB();
  }

  late Future<Isar> instance;

  Future<Isar> openDB() async {
    if (Isar.instanceNames.isEmpty) {
      final dir = await getApplicationDocumentsDirectory();
      return Isar.open(
        [
          TodoSchema,
        ],
        directory: dir.path,
      );
    }
    return Future.value(Isar.getInstance());
  }
}
The IsarService class functions here as a singleton, so we can always use the same instance. The function
Isar.open() is used to initialize the database. The collection schemas are passed, which were
generated with the todo.g.dart file.
Also, a path is specified as a second parameter where the database is stored.
In the main.dart file, openDB() can optionally be called. However, this isn’t strictly necessary since our
IsarService creates an instance anyway as soon as we use Flutter Isar. For development, it can be advantageous
because the Isar Inspector starts immediately. We’ll go into the Isar Inspector in more detail in a later section.
// initial database (optional)
await IsarService().openDB();
Read and Write Transactions
Essentially, Flutter Isar distinguishes between read and write transactions.
Read transactions can be very different. The following examples show only some of the many get, filter, and where queries.
final isar = await IsarService().instance;
final collection = isar.collection<Todo>();

// returns a specific todo
Todo? todo = await collection.get(1);

// returns a list of todos
List<Todo> todos = await collection.getAll([1,2,3]);

// returns all todos
List<Todo> todos = await collection.where().findAll()
For write transactions, there’s only one thing to note. All transactions that change an entry in the database must
be executed within the writeTxn() callback.
This ensures atomicity (completeness). This means if an error occurs in any part of the transaction, the entire transaction is not performed. This prevents database entries from being incorrectly entered in case of an error.
final isar = await IsarService().instance;

// Transaction is started
await isar.writeTxn(() async {
  // todo is retrieved
  final todo = await isar.todos.get(id);

  // check if todo exists
  if (todo != null) {
    // modify todo
    todo.done = done;
    // update todo in database
    isar.todos.put(todo);
  }
});
// Transaction has ended and was completely executed
Back to the example app. Four methods for the todos emerged from this.
You could now outsource these to a separate file or link them with the Bloc pattern, but for simplicity’s sake, I’ve implemented them directly in the widget.
Future<List<Todo>> getTodo() async {
  Isar isar = await IsarService().instance;
  return Future.value(isar.todos.where().findAll());
}

Future<void> addTodo(String todo) async {
  Isar isar = await IsarService().instance;
  await isar.writeTxn(() async {
    isar.todos.put(Todo(todo: todo));
  });
}

Future<void> setTodo(int id, bool done) async {
  Isar isar = await IsarService().instance;
  await isar.writeTxn(() async {
    final todo = await isar.todos.get(id);
    if (todo != null) {
      todo.done = done;
      isar.todos.put(todo);
    }
  });
}

Future<void> removeTodo(int id) async {
  Isar isar = await IsarService().instance;
  await isar.writeTxn(() async {
    isar.todos.delete(id);
  });
}
Putting Everything Together
So we have everything together. Now just package everything together and we have our local todo app. You can find all the code in my Github repo.
import 'package:flutter/material.dart';
import 'package:isar/isar.dart';
import 'package:youtube/models/todo.dart';
import 'package:youtube/utils/isar_service.dart';
class HomeIsarScreen extends StatefulWidget {
static const String routeName = 'home-isar';
const HomeIsarScreen({super.key});
@override
State<HomeIsarScreen> createState() => _HomeIsarScreenState();
}
class _HomeIsarScreenState extends State<HomeIsarScreen> {
String todo = "";
Future<List<Todo>> getTodo() async {
Isar isar = await IsarService().instance;
return Future.value(isar.todos.where().findAll());
}
Future<void> addTodo(String todo) async {
Isar isar = await IsarService().instance;
await isar.writeTxn(() async {
isar.todos.put(Todo(todo: todo));
});
}
Future<void> setTodo(int id, bool done) async {
Isar isar = await IsarService().instance;
await isar.writeTxn(() async {
final todo = await isar.todos.get(id);
if (todo != null) {
todo.done = done;
isar.todos.put(todo);
}
});
}
Future<void> removeTodo(int id) async {
Isar isar = await IsarService().instance;
await isar.writeTxn(() async {
isar.todos.delete(id);
});
}
@override
Widget build(BuildContext context) {
return Scaffold(
appBar: AppBar(
title: const Text('Isar'),
),
body: Center(
child: FutureBuilder<List<Todo>>(
future: getTodo(),
builder: (context, snapshot) {
if (snapshot.connectionState == ConnectionState.waiting) {
return const Text('Loading...');
}
if (snapshot.data!.isNotEmpty) {
return Column(
children: List.generate(
snapshot.data!.length,
(index) {
Todo todo = snapshot.data![index];
return ListTile(
leading: Checkbox(
onChanged: (value) {
setTodo(todo.id!, value ?? false);
setState(() {});
},
value: todo.done ?? false,
),
title: Text(todo.todo ?? ''),
trailing: IconButton(
icon: const Icon(Icons.delete),
onPressed: () async {
await removeTodo(todo.id!);
setState(() {});
},
),
);
},
),
);
} else {
return const Text('No data');
}
},
),
),
floatingActionButton: FloatingActionButton(
child: const Icon(Icons.add),
onPressed: () {
showModalBottomSheet(
context: context,
builder: (context) {
return Container(
margin: const EdgeInsets.all(10),
child: Column(
children: [
TextField(
decoration: const InputDecoration(
labelText: 'What do you want to do?',
border: OutlineInputBorder(),
),
onChanged: (value) {
todo = value;
},
),
const SizedBox(height: 10),
Row(
mainAxisAlignment: MainAxisAlignment.spaceBetween,
children: [
ElevatedButton(
onPressed: () {
Navigator.of(context).pop();
},
child: const Text('back'),
),
ElevatedButton(
onPressed: () async {
await addTodo(todo);
setState(() {});
Navigator.of(context).pop();
},
child: const Text('add'),
),
],
),
],
),
);
},
);
},
),
);
}
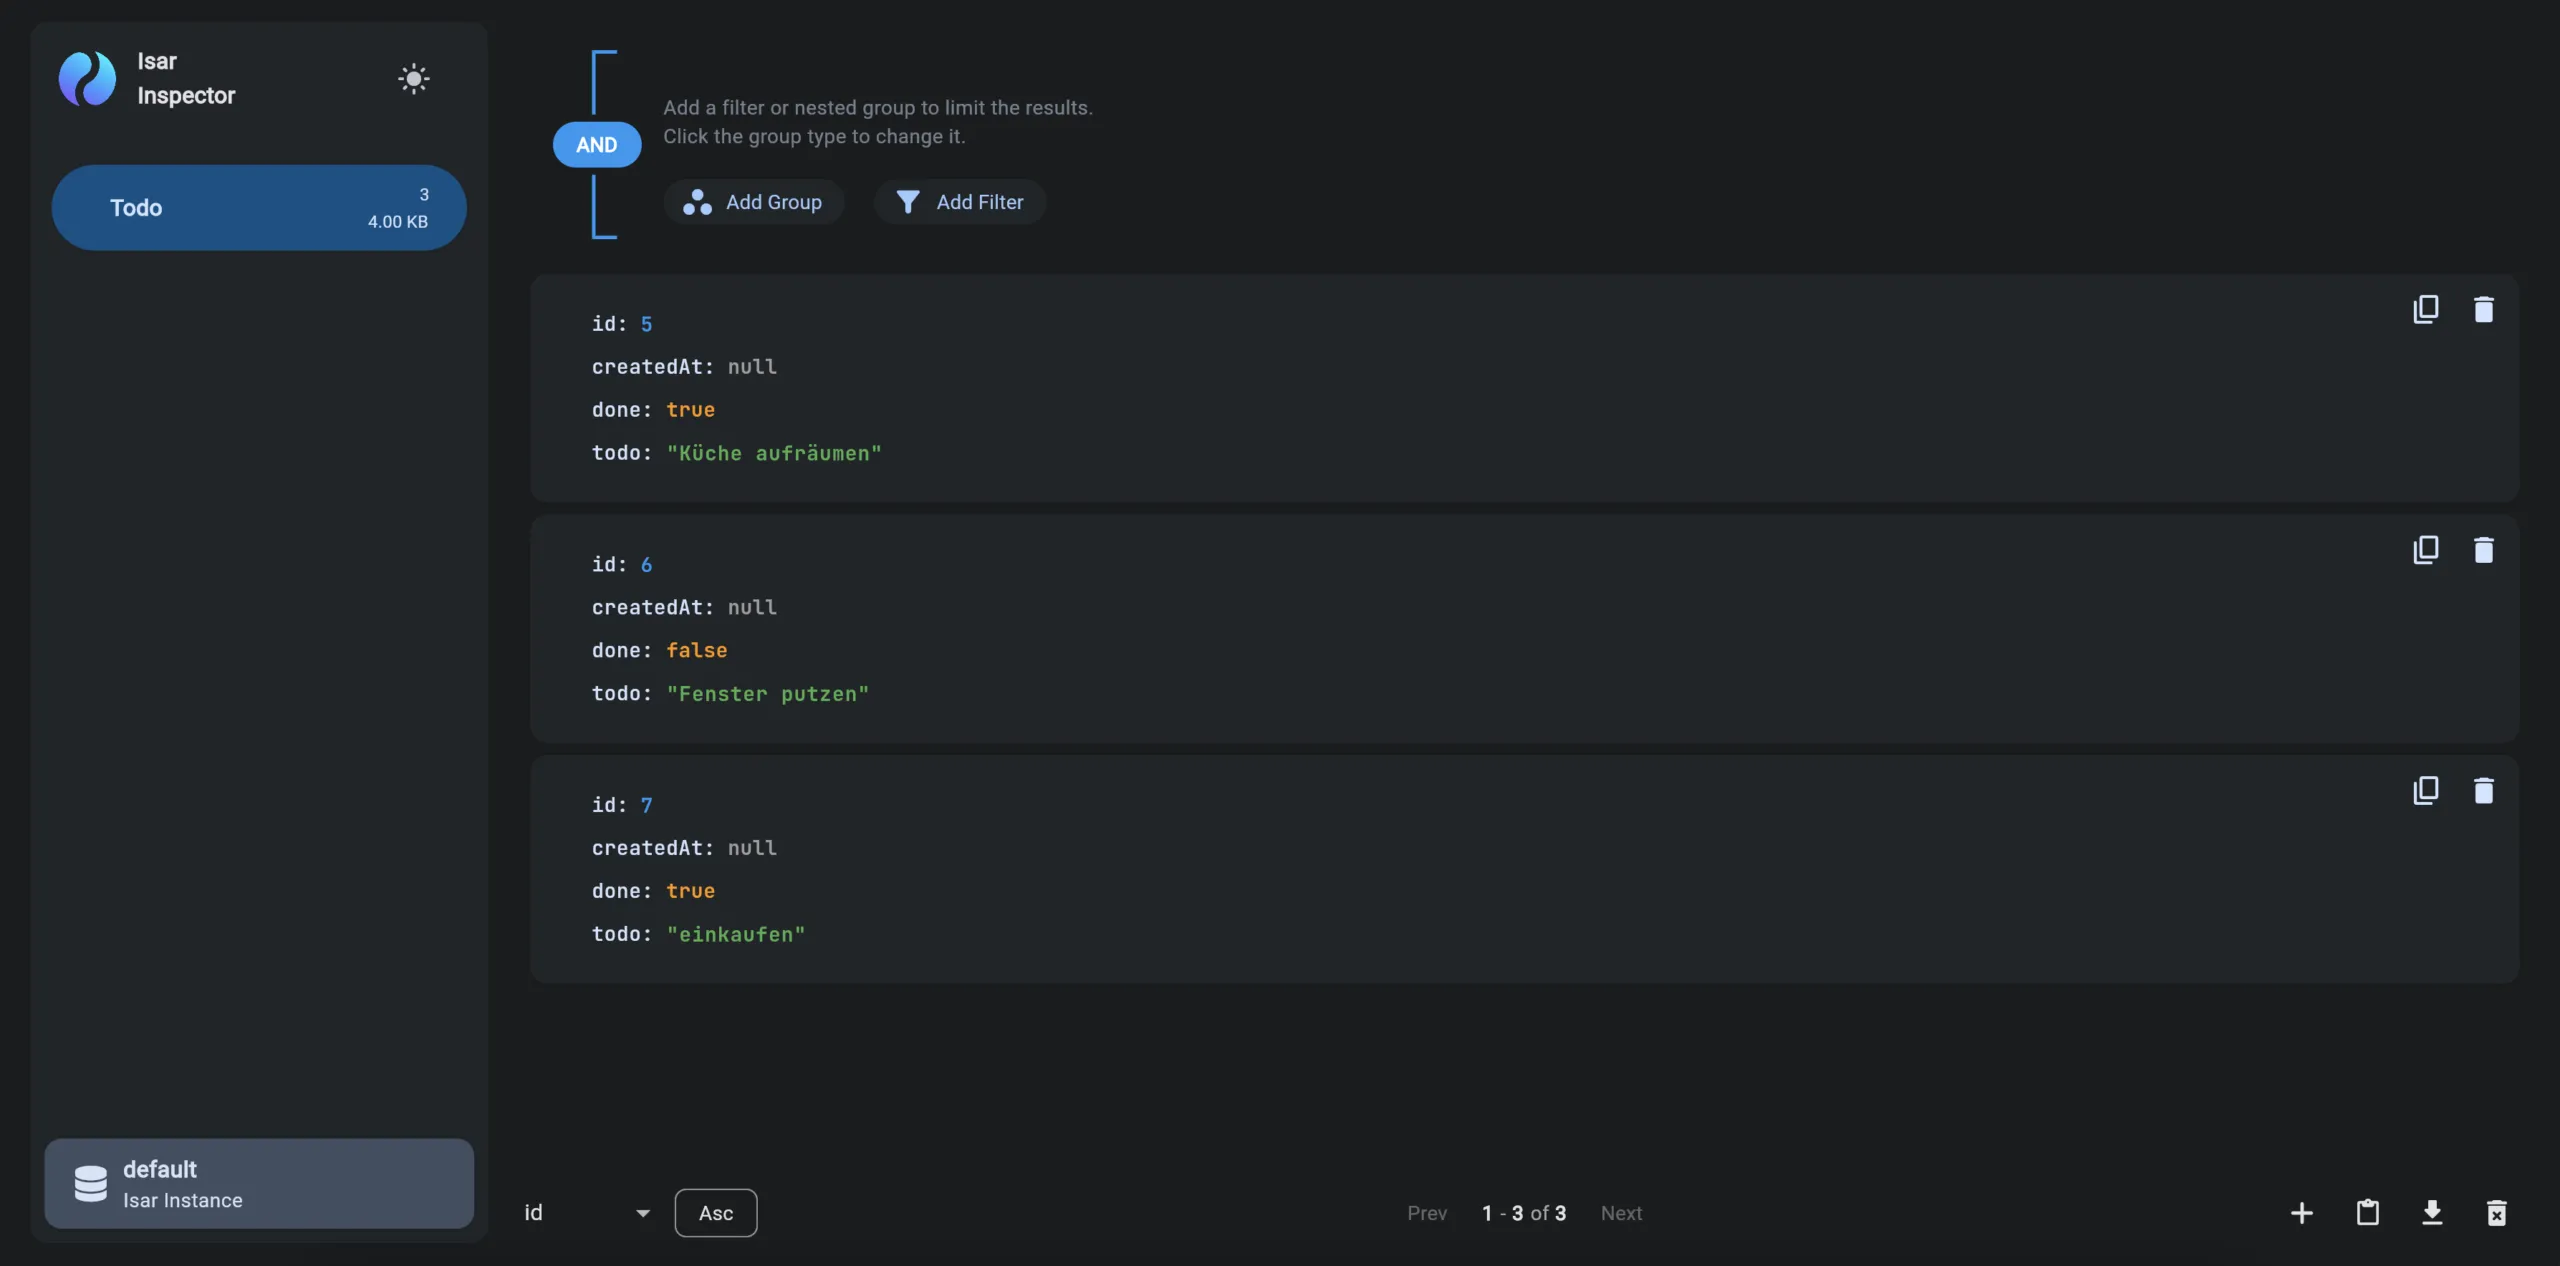
}The Isar Inspector
Now I want to go into the Isar Inspector interface. As soon as you start debug mode, the link to the Isar Inspector is displayed in the command line:
flutter: ╔══════════════════════════════════════════════════════╗
flutter: ║ ISAR CONNECT STARTED                                 ║
flutter: ╟──────────────────────────────────────────────────────╢
flutter: ║ Open the link to connect to the Isar                 ║
flutter: ║ Inspector while this build is running.               ║
flutter: ╟──────────────────────────────────────────────────────╢
flutter: ║ https://inspect.isar.dev/3.1.0+1/#/55350/l-jf1hQcKDU ║
flutter: ╚══════════════════════════════════════════════════════╝
This link takes you to the Isar Inspector interface with a complete overview of your local database.
And WOW, I’m so excited about this. This is something I always missed with Hive. A good interface that helps me with my development. Not only is it possible to add objects or filter the database, but also to add a data record with a JSON file. Even white and dark mode were considered. For me as a UI fan, this is a huge enrichment.
Summary
Flutter Isar really impressed me and made me think more about Offline First. So far, I’ve only scratched the surface of all the functions. I’m curious how it will also affect larger projects.
So anyone who’s thinking about giving their current app a small update and thinking about offline storage or who’s looking for a Hive alternative should take a look at Flutter Isar. Especially since Simon Choi was also involved in Hive. This means he knows the weaknesses of Hive and was able to improve them in Flutter Isar.
Subscribe to Newsletter
Get updates on new blog posts, tutorials and tips about Flutter, Laravel and more.